

Consider this post the "Part B" to my last post about arranging a collection on your walls. . .
Whether you're hanging framed art or objects, in sets of two or four or more. . .

. . . horizontally or vertically. . .
. . . following a single line or a grid, the planning and placing is fairly straightforward—if the individual pieces are all the same size and shape. You measure and plot and level and hammer or drill and hang your collection in fairly short order.

Arrangements become more complicated when your collection consists of pieces of varying sizes, shapes and visual weight. For frames, a gallery system like the one below from Pottery Barn can simplify the process. The bonus here is that you can make changes easily should you tire of the order or any individual element.

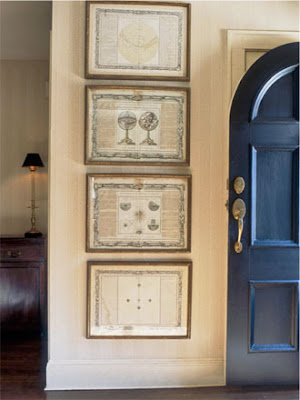
If you wish to hang a collection of varying shapes and sizes directly on the wall in the salon style, as a vertical collage of sorts, you'll benefit from these tips I found at bhg.com.

Here's how to get a successful arrangement like the one you see above:
1) Trace each frame or object in the group onto brown kraft paper and cut out.
2) Label each cut-out with a description of the picture/object or a corresponding number.
3) Accurately mark on each paper cut-out the location of hanging hardware on the back of each frame or object.
4) Using blue painter's tape (its low-tack adhesive won't pull up wall paint), adhere the papers to the wall. Experiment with arrangements until you have one you like. (Here's an extra tip from me: arrange the actual art pieces on the floor nearby so you can see how each piece relates to the next in the order you have in mind. Paper shapes help you achieve a pleasing layout, but seeing the actual objects in those places gives you a better idea of the final look.)
5) Install picture-hanging hardware directly through the paper on the marks you made. Pull paper away and hang pictures one by one.

Even a very large arrangement can be achieved using this method. . .

. . .as you can see in these pics, above and below.

One more tip, for Melanie, who commented on my last post that she has a high-ceilinged wall to decorate in her new home, and would like to use plates somewhere too. . . the photo below combines these two ideas. A very tall wall decorated with a collection of plates in the same pattern becomes a striking focal point in this home's foyer. The paper cut-out method described here would be very useful in a space like this where avoiding mistakes means fewer climbs up and down the ladder.

Photo sources, top to bottom: pointclickhome.com, southernaccents.com, chrismadden.com, pointclickhome.com, potterybarn.com, bhg.com (x5)


20 comments:
That is such an inspiration you´re giving today and on your latest post.
And practical advise as well, it´s always difficult to image how things work together before you start hanging it up!
Thank you
I love the plates. That is a great place to hang them too. I am wondering what I can do on a wall that is attached to the kitchen that is the two story part. I am going to post a picture on my blog and see what you come up with:) Some really big art is needed.
Hi Tracy,
What a great post. Love the idea of putting the nail directly into the paper on the wall. Genius! Thanks for all the help.
~janet
Hey, Tracy!! Thanks for the tips. I'm such a sucker for symmetrical groups of all the same stuff. I've got hanging those down, but I've been wanting to do a more random gallery type wall for a while now.
I'm so excited that Mood Board Monday is going to continue and that I can be a part of it. Thanks for liking the pillow thing, I'm still real nervous about this frist one. Hopefully people will participate!!! Thanks so much!
Thanks Tracy! I like the kraft paper idea to work out an arrangement beforehand. I'm going to try that the next time I want to change an exisiting arrangement.
These picture arrangements are very inspiring. I will definately use your information. Thank you~jamilyn
Wonderful post! Great tips and beautiful pictures.
Another Tracy
I know this is bad, especially for someone as into decorating as I am, but I'm just way too impatient to cut out craft paper and play around with it until the arrangement is just SO....I saw on HGTV a while back some designer use some premade kit where you just pop in your photos into a set of frames (that comes with its own grid for hanging!). Now thats more my speed....
awesome tips for hanging. the plates niche is one of my favorite images ever!!! (there's a spot in my dad's kitchen just like it where I wanted to do that but he lined it with mirror and glass shelves... . it's bad :( but that's another story...)
xoxo
anyway, great
Great visual! Thanks for the post! Done this many times over and it's the way to go!
Ruthie
I needed this tip. My walls are covered with framed prints -- and many more holes because I could never get it right. Thank you!
Hi Tracy, great tips for hanging... it´ll be easier now. Thank you.
Cariños
María Cecilia
It probably would help to do the kraft paper thing, but I just sort of eye ball things and hang them. My husband is the meticulous one. When he hangs things he measures so things are evenly spaced etc. I don't have the patience for all that!
Manuela
Great post and I agree that the paper method does work great when you're doing a larger project of varying sizes. Hope you're having a good day!
pk @ Room Remix
Oh, geez. To be so organized! This is a great method, and I'd like to think I'd use it someday. Instead, I normally just jump in to some project and wing it. Often I like the results, and often I make mistakes and waste a lot of time. Thanks for passing this on.
What great tips!
I've actually cut out paper mimics, which work so well. Your photo of the ones hanging on those knobs have inspired me to do the same. Also liked the oneds hanging a bit randomly on the vertical wood piece. cheers, -susan
You are so good! I absolutely love that plate collection and it truly does make an impact!
xx
This has to be number one worst job to have to do for a client. With them watching you. Love the idea of having the nail measured out on the brown paper. Will have to try.
Oooh love the plates in the niche!
Suzanne
Hi Tracy. I have an award for you! The ‘From me to you’ flowers award. You can pick it up at my blog http://inspiracionline.blogspot.com/, under the entry ‘Thanks for the award!’, posted on Tuesday 17th this month. It's on the first page.
Please let me know if you accept this award, otherwise I'll have to choose another blogger. (I do hope you accept it as your blog is fabulous and you deserve it!)
And just keep up the great work!
Post a Comment