Coat closets. I'll bet it's fair to say that most of us have a love/hate relationship with them. Probably because we need them to do so much more than just hold coats.
. . .
Like the ubiquitous "junk drawer", a coat closet is handy to have but can rapidly become unruly. Well-intentioned organization gives way, under the weight of our busy lives, to "out of sight, out of mind". You open the door or drawer and whatever you have in your hand—coat, umbrella, take-out menu or rubber band—gets added to the mix and closed away (
quickly, before you notice what a mess it is in there!) where you don't have to deal with it. Until you do. Until you find yourself asking, for the
millionth time "Has anyone seen my hat?", "Where did I put that tall vase?", "Why aren't my boots in here?!".
Prompted by Lauren's post wherein she challenged her readers to clean up their coat closets, I finally tackled mine. Knowing full well what I was getting myself into.

See how tiny and dark? But it doesn't look so bad from back here, does it? If you don't look too long at that sad, saggy ironing board cover.
(please don't - it doesn't represent me well) There's a new one, still in its package, shoved into that black hole somewhere. Here's a closer look,
below. Don't be fooled by all that light you see. There's an industrial task light switched on in all of these "before" photos (and a couple of the afters too—dark closet + dark end of the hallway = hard to photograph).

That was the top of the closet, now here's the bottom, below. Most of the stuff on the floor is shoved back into the corners to make room for the vacuum (that shouldn't be there) and the beach bag (that somehow never found a better home).

Neither the beach bag nor the black and white check bag hanging behind the ironing board made it onto the handwritten list you're about to see. I'm sure I missed a few other things too. I was kind of overwhelmed by the sheer number of things that kept coming out. And out. And out. Just for fun—or posterity, or as a future "what was I thinking?" note to self—I wrote it all down:
 Yikes!
 Seventeen (17!) coats and jackets. The letter notations next to each are for myself "T", my husband "D" or my daughter "K", not "toss", "donate" or "keep"—I didn't want you to think this is such a brutal makeover that we ended up with just one jacket between us! There were, however, several jackets and plenty of other things that needed to be moved out and on to a new location or a new life away from this house. To be relocated: a vacuum cleaner that is rarely used (no, not because I don't clean!... but because we have another one that I prefer... and it lives in the garage); shutters I can't seem to part with but don't know what to do with; upholstery foam left over from a project; decorative pillows that should have been put into "pillow storage" in another room, etc. What wasn't kept, relocated or tossed will be donated to an upcoming yard sale or Goodwill. Altogether, just over 100 items came out of that closet—if you count the 12 light bulbs individually.
Are you ready for the "after" now? Me too. But first, let's take a moment to admire the simple beauty of empty space.
Aaahh. . . all that potential. . .

My handy husband installed and painted the shelf near the floor. It's 12" above the floor, to allow ample space for things placed both under and on top of it. It's also 4" shorter than the depth of the closet. I'll show you why a few pics down.

If you have any orphaned shoe stackers hanging around your house, using one or more as a shelf-on-a-shelf is a great way to get more storage for small things in an area that otherwise might not function to its full potential. I had been using one already, but I saw that two would fit, one on top of the other. I realized, however, after huffing and puffing the second one up there, that I needed the height on top of the single stacker for my taller candle hurricanes. So down the second one came.

You've already seen the new closet light (if you read my
last post), but here it is again,
above. I installed that all by myself, I'll have you know. And now. . .
Ta da! The finished, filled up closet. At this angle, it's hard to tell what exactly has changed. . . unless you look closely. The new tan ticking cover made it onto the ironing board and the cluttery stuff hanging behind it is gone. The feather duster's still there—tucked up under the iron rack and hung on a cup hook to keep it securely in place and always ready for action. If you look very closely, to the right of the duster, you'll see one of the best solutions I came up with while restocking the closet. . .

The lint roller that lives in this closet found a new, smarter home. Before the makeover, that roller either stood on end or lay on a shelf where it quite often stuck to whatever was next to it. So when I reached for the lint roller I might sometimes get the spray starch too. Grrr. A magnetic hook hung from the underside of the box that houses our security system's "brain" solved the problem. Simple fixes like this make me really happy!
Here's another look at the first pic on this post, but with notations. . .
. . . so you can "see" what's in those baskets and boxes. The basket on the top shelf is new. I rounded up all the smaller hurricanes and other candle holders, added a few small vases from a cupboard in the kitchen and tucked them into this easy-to-retrieve basket that has handles on its sides. Onto the newly available shelf space, I added two new boxes. I wrapped hard-sided, Christmas-patterned gift boxes in kraft paper to "neutralize" them and added labels to identify the contents: "pillar candles" and "tea lights, tapers, votives". Moving all the candles into this closet freed up even more kitchen cupboard space. Don't you love it when organizing one space, leads to more space in another?!

Now, here's an "after" shot of the floor area, above. So. Much. Better. The basket on the floor used to sit by our front door when my daughter was young. She used it to unload soccer and volleyball gear on her way into the house after practice or games. We still occasionally use it as a stopover spot for wet shoes coming in from the rain or garden. But I much prefer it here, out of sight now, in the closet. To the right of the shoe basket, you can see my red sweeper peeking out. That the sweeper and swiffer both live in this closet is the reason I asked for the shelf to be cut the way it is. . .

The 4" space allows room for the handles of these tools that live in this closet because A) we don't have a broom closet or adequate pantry area in our kitchen, and B) they're much handier here near the rooms they're used in than they would be if they lived in the garage. And look. . . there's that stripedy beach bag again. Given an important new job as the tote for totes. Besides the black and white check one that was already in here, I found a couple of others wandering around the house. As I come across more—and I know that I will—I'll relocate them to the "tote tote" too. Next to the totes, on the new shelf, is a picnic basket. Let's look inside. . .
 Oh no! It's a shark!
 Sorry, didn't mean to scare you. It's our portable Shark vacuum that comes in handy for cleaning up little messes. I purchased the picnic basket just for this job back when we first got the shark, but the vacuum hasn't always lived in it. Here in the cleaned-up coat closet, I'm happy to see the two reunited. And much more conveniently located. Two pics up, you can see that, next to the shark basket, I placed a metal locker basket filled with toys and coloring books for our smaller visitors.
And that's it! Nothing in here that doesn't belong and
more than there was before. Really, there's more. I counted.
Thanks for stopping by to have a look. This has been a long post—almost as long as it took to fix that closet!—so I'll recap the organizational ideas used in a future post where I'll include some other ideas you might be able to use too.


 [Better Homes & Gardens]
 [Elle Decor]
 [Southern Living]
 [Cote de Texas]


 [Martha Stewart Living]


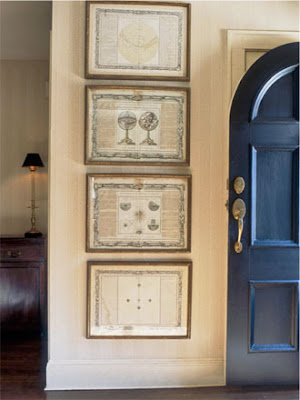
 STEP 3: Take that big painting out of its frame. Your plan is to cut it up into several smaller pieces. Your objective is to create something like this popular treatment...
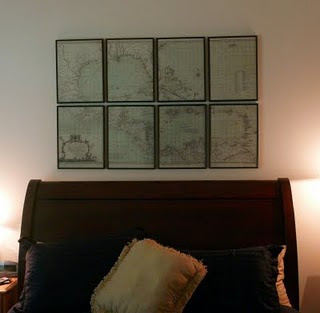 ...or, like the treatment below which requires a large poster or photo enlargement and those square album cover frames. The only difference is that our disassembled and reassembled oil painting is more random.
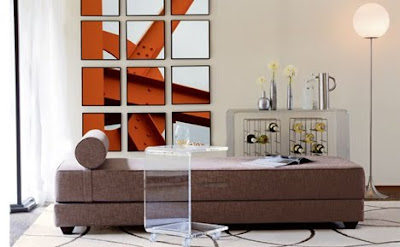 STEP 4: After you've cut your painting into pieces based on your frame sizes—or cut and resized your frames to match your painting sections, you decide which approach works best for you—paint all those frames the same color. A single frame color is important. It unifies the many pieces of your installation so that they read as one work of art. In the treatment I saw, the frames were painted a dark grey, a color pulled from the painting's moody streetscape. This is key to the look—that the frame color blends, does not contrast, with the colors in the painting.
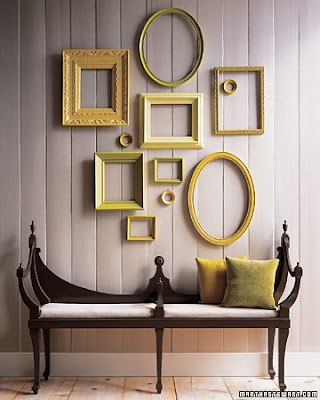 STEP 5: Now, get your cut-up painting pieces into those frames. I don't care how you do it—staples, tape, glue, whatever works best for the situation you have. Nobody's going to see the backs anyway so just make it work. Remember, this is a DIY project so I expect you to be a little bit handy before you even attempt it.
 STEP 6: Hang your new art! As you see in my virtual example above, the designer chose to overlap some of the frames onto the others. He actually used nine separately framed sections for his treatment so I'm sure it took some trial and error to get the layout just right. Please use you imagination to see the frames as all slightly different types and widths. At the show house, the wall behind the art was painted almost the same shade as the frames making the look all about texture and color and mood. The overall size of the arrangement was about 40"x30". If you don't like the overlapped look, try a tightly arranged collage or salon style like this...
 This is a pretty ambitious project, but really not so difficult, and I'd never seen anything quite like it before so I thought it worth sharing. If you're looking for a unique way to fill a large space, I think it's a great idea to file away for when the right situation and materials present themselves.